

| een Tekst Editor voor In-Line help |  |
Een eenvoudige editor voor In-Line help
Aan programma's moet help informatie worden toegevoegd.Dat kan op drie manieren:
-
1. in een extern bestand
2. op een webpagina
3. als onderdeel van het programma
De help informatie is opgeslagen in een stringlist component.
Om de tekst samen te stellen is een eenvoudige editor geschreven.
Toevoeging aan een applicatie geschiedt met een aparte (help) form en unit.
De unit bevat alleen de delen van de editor om de tekst met besturingstekens weer te geven.
Hieronder een iets verkleind plaatje van de editor:
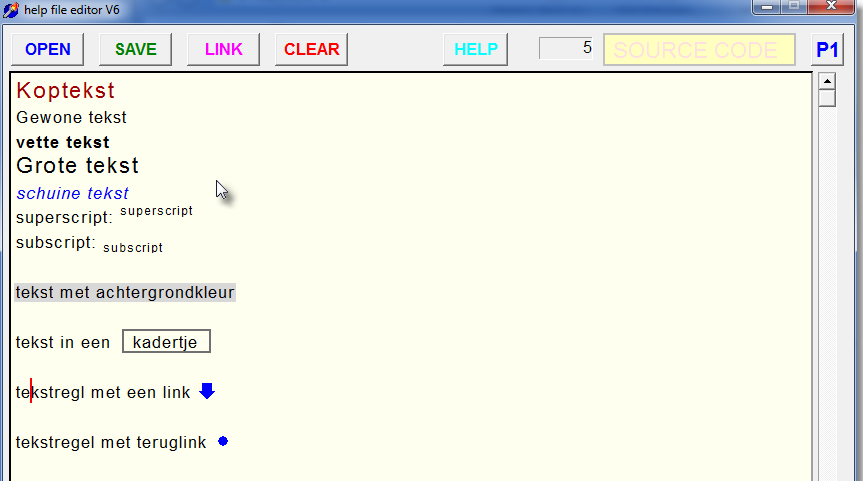
Standaard wordt tekst in het font ōarialö afgebeeld met pixelhoogte 18.
Andere stijlen zijn mogelijk met besturingsopdrachten in de tekst.
Zo'n besturingsopdracht begint met een \ (backslash) teken, gevolgd door een letter.
De mogelijkheden zijn
-
\n normale tekst
\c courier font
\f vette tekst
\l grote letters
\i schuine tekst
\t tab, horizontale uitlijning op veelvouden van 100 pixels
\h koptekst
\@naam; pijl met interne verwijzing
\#naam; locatie aanduiding met naam
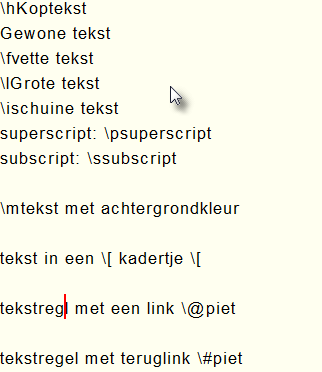
De inhoud kan ook met de besturingsopdrachten en al worden weergegeven.
Zo is te zien wat precies in ingetikt.
Voor de afbeelding hier boven werd deze tekst ingevoerd:
Opmerking 2: \n maakt voorgaande wijzigingen ongedaan
De editor voorziet in 1000 lijnen tekst.
Een regel is maximaal 120 tekens lang.
De tekst kan worden gescrold.
Invoegen van speciale tekens als Ķ , ļ gaat zo:
Houd de alt toets ingedrukt en tik herhaald een ōeö totdat de juiste e verschijnt.
Om de regels te editen zijn er nog deze commando's : (CTRL = CONTROL toets)
-
CTRL X wis de regel
CTRL Y verwijder de regel
CTRL Z voeg een nieuwe regel in
Het aardige van deze editor is, dat er eenvoudig uitbreidingen toegevoegd kunnen worden.
Dat kan voor speciale programma's handig zijn.
Het project
Dat is geschreven in Delphi-7 en inmiddels is versie 6 bereikt.Form1/unit 1 bevat
-
een paintbox voor het tonen van de tekst
afhandeling van toetsenbord en muis events
procedure voor het weergeven van de tekstregels
procedure voor het scrollen
cursor besturing
procedures voor het opslaan en openen van de tekst
Helpform/helpunit bevatten een deel van de procedures van form1/unit1:
voldoende om de tekst weer te geven en te scrollen.
Deze helpform/helpunit kunnen aan een project worden toegevoegd voor In-Line help.
Het programma
const maxcolumn = 120;
      maxline = 1000;
      linesperpage = 31;
      lineheight = 25;
      maxtopline = maxline - linesperpage;
      standardfont = 'arial';
      standardheight = 20;
      largeheight = 25;
      smallheight = 15;
      standardcolor = $000000;
      altcolor = $00a000;
      headercolor = $0000ff;
      standardbrush = $f0ffff;
      altbrush = $d8d8d8;
      standardstyles = [];
 topmarge = 5;
 leftmarge = 5;

var textBuf : array[1..maxcolumn,1..maxline] of char;
    lineNr : smallInt;   //line of cursor
    colNr : byte;        //column of cursor
    topline : smallInt;  //line at top of page
    bm : Tbitmap;
    realmode : boolean = true;
    cursrect : Trect;
    cursOn   : boolean;
    scanmode : Tscanmode;
De tekst staat in textbuf, elke regel wordt met #0 (character 0) afgesloten.Tekst wordt geschreven in de bitmap bm. De cursor alleen in de paintbox,
dus die is altijd te wissen door een stukje (cursrect) van bm naar de paintbox te kopiļren.
Topline is de regel die bovenaan in de paintbox staat.
Bij het lezen van de tekst moet onderscheid worden gemaakt tussen besturingscodes en tekst.
type TScanmode = (smRead,smControl,smSkip,smReal);betekenis:
-
smRead : test op control character \, dat moet niet geschreven worden
smControl : na het \ character staat de edit code
smSkip : skip de naam na een \@ of \# commando
smReal : teken elk character, zodat de besturingscodes zichtbaar zijn
function getcharwidth(c : char) : byte;
//supply width of c
begin
 result := trunc(bm.Canvas.textwidth(c)*1.1)+1;
end;

function getTextLength(nr : smallInt) : byte;
//supply length of line, #0 ends string
var i : byte;
begin
 i := 1;
 while (i <= maxcolumn) and (textbuf[i,nr] <> #0) do inc(i);
 result := i-1;
end;

procedure paintline(nr : smallInt);
//paint & update regel nr
var      i : byte;
     px,py : word;
        cc : char;
        dy : integer;
begin
 dy := 5;
 px := leftmarge;
 py := (nr-topline)*lineheight+topmarge;
 linemode(0,px,py); //switch off
 bmNormal; //reset to default font
 if realmode then scanmode := smReal else scanmode := smRead;
 with bm.canvas do
  for i := 1 to getTextlength(nr) do
   begin
    cc := textBuf[i,nr];
    case scanmode of
     smRead    : if cc = controlchar then scanmode := smControl
                  else
                   begin
                    textout(px,py+dy,cc);
                    px := px + getcharwidth(cc);
                    linemode(2,px,py); //kadertje tekenen
                   end;
     smControl : begin
                  scanmode := smRead;
                  case upcase(cc) of
                   'C' : font.Name := 'courier new';
                   'L' : begin
                          font.height := largeheight;
                          dy := 0;
                         end;
                    'S' : begin
                           font.height := smallheight;
                           dy := 12;
                          end;
                    'P' : begin
                           font.height := smallheight;
                           dy := 0;
                          end;
                    'N' : begin
                           font.name := standardfont;
                           font.color := clBlack;
                           font.height := standardheight;
                           font.style := [];
                           brush.color := standardbrush;
                           font.Color := $0;
                           dy := 5;
                           linemode(0,px,py);//uitschakelen
                          end;
                    'F' : font.style := font.Style + [fsbold];
                    'M' : begin
                           brush.Style := bsSolid;
                           brush.color := altbrush;
                          end;
                    'T' : px := ((px div 100)+1)*100;
                    '[' : linemode(1,px,py);    //init
                    'I' : begin
                           font.Style := font.Style + [fsItalic];
                           font.color := clBlue;
                          end;
                    'H' : begin
                           font.Color := $0000a0;
                           font.Height := 25;
                           dy := 0;
                          end;
                    '@' : begin
                           draw(px,py,arrow);
                           inc(px,arrow.width);
                           scanmode := smSkip;
                          end;
                    '#' : begin
                           draw(px,py,dot);
                           inc(px,dot.width);
                           scanmode := smSkip;
                          end;
                  end;//case
                 end;
       smSkip :  case cc of
                  ';', ' '    : scanmode := smRead;
                  controlchar : scanmode := smControl;
                 end;
       smReal : begin
                 textout(px,py+dy,cc);
                 px := px + getcharwidth(cc);
                end;
    end;//case
   end;//for
end;
Zoals is te zien kunnen eenvoudig extra besturingscodes worden toegevoegd.De lijn staat nu in de bitmap en moet in de paintbox worden getoond.
Daarvoor zorgen:
function getLineRect : Trect;
var nr : smallInt;
begin
 nr := lineNr - topline;
 with result do
  begin
   Left := 0;
   Right := bm.Width;
   Top := nr * lineheight + topmarge;
   Bottom := Top + lineheight;
  end;
end;

procedure eraseLine;
var r : Trect;
begin
 r := getLineRect;
 with bm do with canvas do
  begin
   brush.color := standardbrush;
   brush.Style := bsSolid;
   fillrect(r);
  end;
end;

procedure showline;
var r : Trect;
begin
 r := getLineRect;
 form1.helpbox.canvas.copyrect(r,bm.Canvas,r);
end;

procedure refreshline;
begin
 cursOn := false;
 eraseline;
 paintline(lineNr);
 showline;
 cursorOn;
end;
Interne links
Help informatie zal meestal beginnen met een inhoudsopgave.Het is handig om vanuit die inhoudsopgave direct naar een onderwerp te kunnen springen.
Daarvoor dient de opdracht \@piet; die een pijltje neerzet:
ōpietö is de naam van de regel die bovenaan in de paintbox komt te staan als op het pijltje wordt geklikt.
Bij de bovenstaande opdracht hoort: \#piet; wat een rondje oplevert:
Om effectief te zijn, moet de naam ōpietö in de linklist staan.
Indrukken van de menuknop LINK maakt deze lijst.
Const maxlink = 50;

type TLinklist = record
                  s  : string;
                  px1 : smallInt;   //x position
                  px2 : smallInt;
                  L1  : smallInt;   //first line
                  L2  : smallInt;   //second line
                 end;

var linklist : array[1..maxlink] of TLinklist;
    linkcount : byte;
s is de naam.
Px1..px2 zijn de horizontale pixel posities (links, rechts) op de regel.L1 is de lijn waarop het pijltje staat, dus de \@ opdracht.
L2 is de lijn waarop het rondje staat, de \# opdracht.
procedure makelinklist;
var i,n,k : byte;
        j : smallInt;
       cc : char;
        m : Tscanmode;
     orgF : boolean;
       id : string;
       OK : boolean;
begin
 orgF := false;
 n := 0;
 for j := 1 to maxline do
  begin
   m := smRead;
   for i := 1 to gettextlength(j) do
    begin
     cc := textbuf[i,j];
     case m of
      smRead    : if cc = controlchar then m := smControl;
      smControl : case cc of
                   '@' : begin
                          m := smSkip;
                          orgF := true;
                          id := '';
                         end;
                   '#' : begin
                          m := smSkip;
                          orgF := false;
                          id := '';
                         end;
                   else m := smRead;
                  end;
      smSkip    : case cc of
   controlchar : m := smRead;
           ';' : begin
                  m := smRead;
                  if (n < maxlink) and (length(id) > 0) then
                   if orgF then
                    begin
                     inc(n);
                     linklist[n].s := id;
                     linklist[n].L1 := j;
                     linklist[n].px1 :=
                        getCursorPos(i,j)-arrow.width;
                    end
                    else
                     if linkpos(k,id) then
                      begin
                       linklist[k].L2 := j;
                       linklist[k].px2 :=
                          getcursorpos(i,j)-dot.Width;
                      end;
                 end;
                 else id := id + cc;
                  end; //case cc of
     end;//case
    end;//i
  end;//j
 with form1.msgtext do
  if n = 0 then caption := 'no links found'
   else caption := 'links found = '+ inttostr(n);
 linkcount := n;
 OK := linkcount > 0;
 i := 0;
 while OK and (i < linkcount) do
  begin
   inc(i);
   with linklist[i] do
    begin
     if L1 = L2 then
      begin
       OK := false;
       form1.msgtext.caption := 'line '+ inttostr(L1)+
                                ' points to itself';
      end;
      if L2 = 0 then
       begin
        OK := false;
        form1.msgtext.caption := 'line '+ inttostr(L1)+
                                 ' points to nothing';
       end;
    end;
  end;//while
 OK := linkcount > 1;
 i := 0;
 while OK and (i < linkcount-1) do
  begin
   inc(i);
   k := i;
   while OK and (k < linkcount) do
    begin
     inc(k);
     OK := linklist[i].s <> linklist[k].s;
     if OK = false then form1.msgtext.Caption :=
       'duplicate link names';
    end;
  end;
end;
De hele tekst wordt doorlopen waarbij gezocht wordt naar \@ en \# commando's.Gecontroleerd word of de pijltjes en rondjes matchen.
De functie getcursorpos levert de positie van de cursor. Zie de source code.
Bewaren van Help bestanden
De help informatie wordt opgeslagen als text bestand.
procedure Tform1.saveBtnClick(Sender: TObject);
var w       : word;
    size    : word;
    outfile : textfile;
    s       : string;
    OK      : boolean;
begin
//bepaal de lengte van de tekst
 size := 0;
 OK := false;
 for w := 1 to maxline do if gettextlength(w) > 0 then size := w;
 if size = 0 then exit;

 with form1.SaveDialog1 do
  if execute then
   try
    assignfile(outfile,filename);
    rewrite(outfile);
    for w := 1 to size do
     begin
      s := buf2string(w);
      writeln(outfile,s);
     end;
    OK := true;
   finally
    closefile(outfile);
    If OK then msgtext.Caption :=
     'file saved. Lines = '+inttostr(size)
     else msgtext.Caption := 'cannot write file';
   end;
end;
Voor verdere details verwijs ik naar de source code.De Help Editor is heel simpel, maar heeft zijn nut reeds bewezen.
Een toepassing van de helptekst is te vinden in het grafiek programma
graphics-explorer zie HIER .

