

 |
 |
a non recursive Floodfill algorithm |  |
 |
Note: a new floodfill article is being written,
together with an exerciser program which is 50 times faster.
This article will be replaced within days (27-02-20150).
Introduction
Floodfill is a method of the canvas to fill a random shape with a pattern.
This pattern is obtained from 'brush.style' for predefined patterns or 'brush.bitmap' for user defined patterns.
Options are limited in these cases.
Hereafter I present a floodfill algorithm which may serve as a basis for fillstyles using very large, multicolor, bitmaps
as a brush and incorporate transparency as well.
The fsBorder fillstyle is used, the shape to be filled should be bound by a predefined color.
"Non recursive" is a big advantage because is prevents violating stack bounderies when filling too large shapes.
The Algorithm
The algorithm is derived from the maze algorithm published in 1895 by Gaston Tarry.
This algorithm supplies a method to escape from a maze, however complicated it may be.
In case of returning to the starting position of the maze, one is sure that no exit exists.
Mathematically, a maze may be described by nodes and connections, so by a graph.
A connection is a road, drawn as a straight line, but in reality it will be changing directions to confuse the visitor.
A node is a place where roads split or join, so, where a decision should be made when traversing the maze.
Starting at an arbitrary place in the maze, according to Tarry's algorithm,
two distinct signs should be painted along the route
-
1. a sign marking the entrance of a new (not yet visited) node
2. a sign marking a choosen road starting at a node
-
1. a road may not be traversed twice in the same direction
2. the entrance road back from a node to the previous one may only be choosen if all exit roads have been traversed
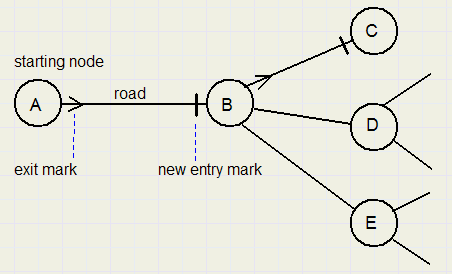
Starting at A, an exit mark is placed. Arriving at new node B, an entry mark is placed.
Choosing the road to C, again an exit mark is placed as well as an entry mark when entering new node C.
If C has no exit roads, the road back to B is taken. At B, a new route, say to D, is choosen, exit mark placed etc.
In this way there is certainty that the exit is found. A road is traversed only once in each direction.
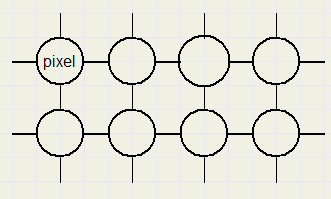
A canvas may be considered as a maze, see picture below, where adjacent pixels are connected by roads
in horizontal- and vertical directions.
Of course, there is no exit. So at the end of the search we will return at the starting point with the certainty however
that every node has been visited.
Implementation
A byte array B of the same size as the paintbox is used.
B[x,y] corresponds with canvas.pixels[x,y]
First, the canvas containing the shape is scanned, conditions found are recorded in B.
Then, a walk on B, started at a point of choice, investigates B[ ] and pixel positions
to be filled later on the canvas are marked.
Conditions coded in each byte of B are:
| bit | meaning |
| -01- | direction 0..3 in which byte was entered |
| -3- | scan started at this byte |
| -6- | bordercolor detected |
| -7- | pixel to be filled |
Direction bits:
| code | direction | previous pixel |
| 00 | right | x := x - 1 |
| 01 | left | x := x + 1 |
| 10 | up | y := y + 1 |
| 11 | down | y := y - 1 |
Notice that the opposite direction is obtained by 'direction xor 1'
The floodfill procedure is made up of the following parts:
-
- setup
- startup
- nextpixel
- previouspixel
- fill
- free
(setup)
Memory is reserved for dynamic array B.
All bytes B[0,y] , B[x,0] , B[width-1,y] , B[x,height-1] are set to $40
to indicate the border color at its edges.
This eliminates testing for array boundaries during scanning.
The canvas is scanned and B[x,y] set to $40 for each occurrance
of the border color.
(startup)
Scanning now continues using array B only.
A mouseclick on the paintbox provides the starting point [x,y].
The following takes place:
- if B[x,y] has the border bit -6- set, the operation terminates, else
- in B[x,y] the startcode bit-3-is set, indicating the scan started here.
- bit -7- is set to mark this position to be filled later.
- variable dir holding the 2 bits direction code, is set to -00-.
- continue with program code 'nextpixel'
(nextpixel)
using dir the next [x,y] is computed
The new B[x,y] is tested for bit 6 or 7 set.
If not set:
- dir code is entered in B bits 0,1
- fill bit -7- is set
- dir code is reset to zero if dir < > 1
(if going left: continue left else go right)
- goto program code 'nextpixel'
if B[x,y] bit 6 or 7 was set:
- goto program code 'previouspixel'
(previouspixel)
- if B[x,y] startbit -3- set, goto program code 'fill'
- using dir code, compute previous byte position
- using dir code, compute next direction
- if this new direction is the opposite of the direction in this byte:
- increment dir again
If all directions done: (dir = 4)
- set dir to direction code in B
- goto program code 'previouspixel'
This is the essential step in scanning the array:
never return to a previous byte until all other directions have been taken.
(fill)
Scan paintbox and take action for every pixel that has bit -7- set
in the corresponding byte of B.
(free)
Free the memory reserved for B.
Notes
Byte array B holds (by the direction bits) the path over which the image is scanned.
Note, that scanning of the image preferably takes place in horizontal directions.
Reason is to take advantage of the scanline property of the bitmap for fast access of pixels in the same row.
In the final version and implementation of floodfill, I use the (existing) bitmap instead of
a separate array of bytes. Bits 24..31 of the pixel instead of array B are used to store the node-information.
Also, in the final version (not shown here) I distinguish 4 colorlevels.
Instead of using a border color, level 0 acts as a border color.
The idea behind colorlevels is that a lower color never can overwrite a higher color.
The generation of the masks is also not shown in this article.
Colorlevels and mask generation may be a topic for a next article.
The maze algorithm of Tarry may be applied in a wide variety of situations:
- to actually escape from a maze (or building when locked in)
- to find your way in (government) bureaucratic structures
- to program robots that cleansweep roads in town
- to send messages over a network
 |
Program Example
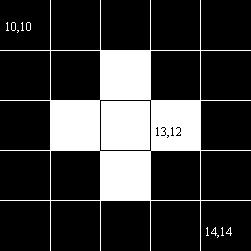
B[13,12] no border: B[13,12] := $88;
dir := 0; nextpixel B[14,12]
B[14,12] border set: previouspixel B[13,12];
dir + 1 (=1); nextpixel B[12,12];
B[12,12] no border: B[12,12] := $81; nextpixel B[11,12];
B[11,12] no border: B[11,12] := $81; nextpixel B[10,12];
B[10,12] border set: previouspixel B[11,12];
dir + 1 (=2); nextpixel B[11,11];
B[11,11] border set: previouspixel B[11,12];
dir + 1 (=3); nextpixel B[11,13];
B[11,13] border set: previouspixel B[11,12];
dir + 1 (=4); all done;
dir := B[11,12] and $f (=1); previouspixel B[12,12];
dir + 1 (=2);
B[12,11] no border: B[12,11] := $82;
dir := 0; nextpixel B[13,11];
B[13,11] border set; previouspixel B[12,11];
dir + 1 (=2); nextpixel B[12,10];
B[12,10] border set: previouspixel B[12,11];
dir + 1 (=3); illegal direction:
dir + 1 (=4): all done:
dir := B[12,11] and $f (=2); previouspixel B[12,12];
dir + 1 (=3); nextpixel B[12,13];
B[12,13] no border: B[12,13] := $83;
dir := 0; nextpixel B[13,13];
B[13,13] border set: previouspixel B[12,13];
dir + 1 (=1); nextpixel B[11,13];
B[11,13] border set: previouspixel B[12,13];
dir + 1 (=2) illegal:
dir + 1 (=3); nextpixel B[12,14];
B[12,14] border set: previouspixel B[12,13];
dir + 1 (=4); all done:
dir := B[12,13] and $f (=3); previouspixel B[12,12];
dir + 1 (=4); all done:
dir := B[12,12] and $f (=1); previouspixel B[13,12];
dir + 1 (=2); nextpixel B[13,11];
B[13,11] border set: previouspixel B[13,12];
dir + 1 (=3); nextpixel B[13,13];
B[13,13] border set: previouspixel B[13,12];
dir + 1 (=4); all done: startbit set : goto fill;
The program
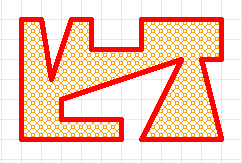
Add 1 paintbox to the form, width = 300, height = 200 pixels.
Add 3 buttons to the form for shape selection and 1 bitbutton for clearing the paintbox.
The byte array is PBB.
Remark:
In this program no use is made of the scanline property of the bitmap.
Therefore, the filling process is very slow, but the principle of operation is shown very clearly.
Applying the scanline property will reduce processing time considerably.

unit Unit1;
{
 -------a non-recursive floodfill algorithm--------------
 author: David E. Dirkse
         march 2004, Castricum, the Netherlands
         david@davdata.nl
}

interface

uses
  Windows, Messages, SysUtils, Classes, Graphics,
  Controls, Forms, Dialogs,  StdCtrls, ExtCtrls;

type
  TForm1 = class(TForm)
    PaintBox1: TPaintBox;
    Button1: TButton;
    Button2: TButton;
    Button3: TButton;
    Button4: TButton;
    procedure Button1Click(Sender: TObject);
    procedure PaintBox1MouseDown(Sender: TObject;
      Button: TMouseButton; Shift: TShiftState;
      X, Y: Integer);
    procedure Button2Click(Sender: TObject);
    procedure Button3Click(Sender: TObject);
    procedure Button4Click(Sender: TObject);
  private
    { Private declarations }
  public
    { Public declarations }
  end;

var
  Form1: TForm1;

implementation

{$R *.DFM}

{
 bytearray 0,1: entrydirection
             3: startposition
             6: borderdetect
             7: fill
}

const bordercolor : longInt = $0;
      fillcolor : longInt = $ff00;

procedure GoFill(x,y : integer);
type TByteBox = array[0..299,0..199] of byte;
var PBB : ^TByteBox;
    dir,b : byte;
    x1,y1 : integer;
label free,fill,nextpixel,previouspixel;
begin

//setup----------------

 try
  GetMem(PBB,sizeof(PBB^));
  for y1 := 0 to 199 do
  for x1 := 0 to 299 do
   if form1.paintbox1.canvas.pixels[x1,y1] = bordercolor then
    PBB^[x1,y1] := $40 else PBB^[x1,y1] := 0;
  y1 := 0;
  for x1 := 0 to 299 do PBB^[x1,y1] := $40;//set bordercolor
  y1 := 199;
  for x1 := 0 to 299 do PBB^[x1,y1] := $40;//set bordercolor
  x1 := 0;
  for y1 := 0 to 199 do PBB^[x1,y1] := $40;//set bordercolor
  x1 := 299;
  for y1 := 0 to 199 do PBB^[x1,y1] := $40;//set bordercolor

//----------startup

  if (PBB^[x,y] and $40) <> 0 then goto free;//if started on border

  PBB[x,y] := $88;          //set startdir,fillbit
  dir := 0;

nextpixel:

  case dir of
   0 : inc(x);
   1 : dec(x);
   2 : dec(y);
   3 : inc(y);
  end;
  if (PBB^[x,y] and $c0) <> 0 then goto previouspixel;
  PBB^[x,y] := $80 or dir;//record fill + entry-direction
  if dir <> 1 then dir := 0;//compute exit-direction
  goto nextpixel;

previouspixel:

 case dir of
  0 : dec(x);
  1 : inc(x);
  2 : inc(y);
  3 : dec(y);
 end;
 b := PBB^[x,y];
 inc(dir);
 if (b and $f) = (dir xor 1) then inc(dir);//skip entry-direction
 if dir > 3 then
  begin
   dir := b and $f;
   if dir >= 8 then goto fill else goto previouspixel;
  end
 else goto nextpixel;

fill:

 for y := 0 to 199 do
  for x := 0 to 299 do
   if (PBB^[x,y] and $80) <> 0 then
    form1.paintbox1.Canvas.pixels[x,y] := fillcolor;

free:

 finally
  FreeMem(PBB);
 end;
end;

procedure TForm1.PaintBox1MouseDown(Sender: TObject;
  Button: TMouseButton; Shift: TShiftState; X, Y: Integer);
begin
 GoFill(x,y);
end;

procedure TForm1.Button1Click(Sender: TObject);
begin
 paintbox1.canvas.polygon([point(0,0),point(10,180),
  point(290,60), point(100,5),point(90,60)]);
end;

procedure TForm1.Button2Click(Sender: TObject);
begin
 with paintbox1.canvas do
  begin
   ellipse(10,10,280,180);
   ellipse(50,50,220,120);
  end;
end;

procedure TForm1.Button3Click(Sender: TObject);
begin
 with paintbox1.canvas do
  polygon([point(10,10),point(280,12),point(283,20),
           point(20,25),point(20,68),point(280,55),
           point(280,80),point(200,80),point(200,190),
           point(180,190),point(180,105),point(150,110),
           point(135,150),point(130,85),point(15,78)]);
end;

procedure TForm1.Button4Click(Sender: TObject);
begin
 paintbox1.canvas.rectangle(100,100,130,103);
end;

end.
Interested in the complete Delphi-7 project? Click [ here ] to load.Additional notes
1.
A separate array of bytes to record the walk over the bitmap is not necessary in case of a pf32bit data format.
In this case, the unused bits 24..31 of a pixel (byte 3) may be used instead.
2.
To address the bytes in the bitmap in case 1. , do not use the pixels[x,y] method as this is very slow.
Obtain the base address p0 of the bitmap with p0 := dword(bitmap.scanline[0]).
Save it as 32 bit integer to facilitate calculations.
If p is the address of byte3 of pixel[x,y] then
-
p := p0 - y*bitmap.width + (x shl 2) + 3

