

 |
 |
the Xfont project |  |
 |
Introduction
The Xfont project allows the creation of your own font.Xfont project was started to build a math-font containing characters of special operators as of set theory
together with the characters of the Greek alphabeth.
To avoid redundant work, existing images may be used.
These character images may be altered , new images added and new character codes may be assigned.
Which properties this font should have?
We want the same font for the screen as well as the printer.
Normal height of a screen character is 16 pixels.
For a printout, having a higher resolution, a 3 fold magnification is required, so normal fontheight here is 48 pixels.
Another requirement is a printout of double the normal height without any loss of quality.
So, the image should be defined minimally as a 96 pixel height image.
The next question is how to encode the character images.
The most simple way is a bitmap.
The best quality is achieved by using separate bitmap images per size and per style.
However, an enormous amount of storage space is required because each bitmap also should have
its 3 fold magnified counterpart for printouts.
Handling such an amount of bitmaps is not very practical.
Another way of encoding is by means of vectors.
( a vector is simply a sequence of numbers which describe an object).
Characters are decomposed in short lines and ellipse arcs in this case.
Advantage is sharp character images, even if enlarged where enlarged bitmaps cause 'steps' in diagonal lines.
The drawing of vectored fonts is more difficult.
Different font files are needed per style such as italic or bold.
The 'arial' font is organised in this way.
In case of the Xfont a blend is choosen of the above methods.
This method may be called a "vectorised bitmap".
A character is first pictured in a big , monocolor, 96 * 96 bitmap.
By reduction or magnification the desired fontheight is achieved.
Also, in case of reduction, the character is displayed with soft edges.
With help of some math, the character may be pictured in various styles.
Only one small font file is needed and the drawing process is relatively fast.
Character Layout
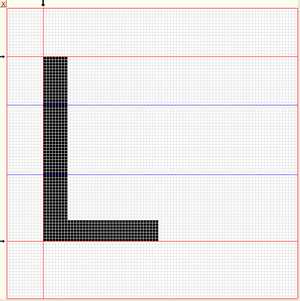
Figure 1. below shows the layout of the 96 * 96 bitmap. 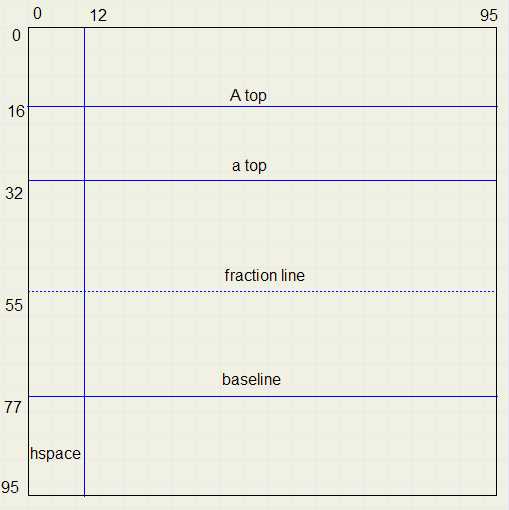 |
| fig1. |
Also the textcursor may be parked here.
Characters rest on the baseline. Room below the baseline and above A top provides separation between lines.
The ' - ' sign is positioned on the fraction line, the ' = ' is centered around it.
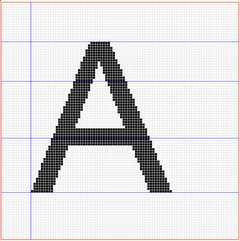
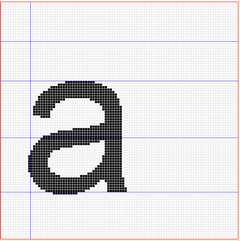
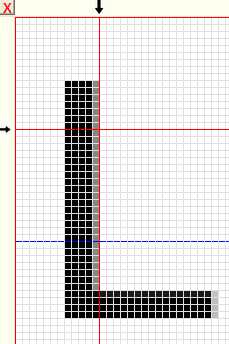
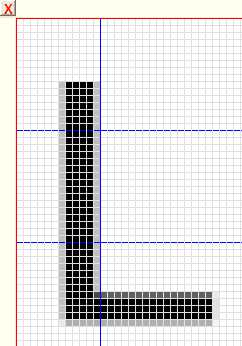
See figure 2 for the placement of some characters, enlarged in 96 * 96 pixels
 |
 |
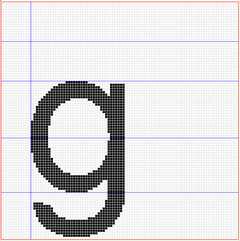 |
| fig2a. | fig2b. | fig2c. |
Coding the characters
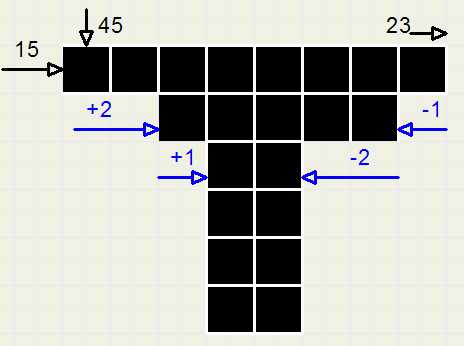
We start with a black picture on a white background.Figure 3b shows an arbitrary character. A square is a pixel.
 |
 |
| fig3a. | fig3b. |
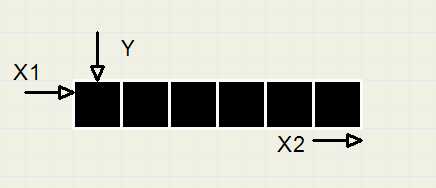
The character is decomposed into horizontal lines of adjacent pixels.
Such a line I call a stripe. Figure 3a shows a stripe of 6 pixels.
Figure 3b. shows a picture of 6 stripes.
The upper stripe starts at (15,45) and ends at (23,45).
The position of the stripes is set by some simple instructions, each with a length of 10 bits. See figure 4:
 |
| fig4. |
The SX1 (001) and SX2 (010) instructions set begin and end of the stripe.
Drawing the stripe is done by the PI (10) or PR (011) instruction.
The PI instruction draws the stripe from X1 to X2 at row Y and after that
-
1. increases Y value by 1, pointing to the next row below
2. increase X1 by dx1 (-8 ...+7)
3. increase X2 by dx2 (-8 ...+7)
dx1 and dx2 are 4 bit signed integers in 2- complement notation.
The list of stripecodes below describes the character in figure 3b:
-
SY 45
SX1 15
SX2 23
PI 2,-1
PI 1,-2
PI 0,0
PI 0,0
PI 0,0
PI 0,0
The stripelist above may be compreesed into
-
SY 45
SX1 15
SX2 23
PI 2,-1
PI 1,-2
PR 4
This process will be described further down this article.
Scanning a character.
The stripes of a character must be scanned to generate the characters stripelist.As an example we take the character 'A' of figure 2a.
Scanning takes place left to right and top to bottom.
A scanned pixel must be 'marked' to avoid double scanning.
So, the left leg of the 'A' is scanned first. At the long horizontal line connecting the left and right leg,
a SX2 instruction is needed because X2 has an increase too large to be handled by the PI instruction.
At the left leg end below, scanning resumes at the top of the character again to make the
stripe instructions for the right leg.
This process continues until all pixels have been scanned.
At this time the stripelist will be compressed by replacing adjacent PI 0,0 instructions by a PR instruction.
Data flow
See figure 5:  |
| fig5. |
The 'offset' control provides for vertical positioning.
'Level' is a selection for color level. The edges of a character contain lighter pixels for smoothing.
Adjusting the level of black-white results in slightly wider or thinner character.
Wmap is scanned pixel by pixel.
Each pixel is represented by value $0f (character) or $00 (background) of the corresponding byte in array Emap.
After scanning this value of $0f is changed to $01.
Information in Emap is displayed 7 times enlarged in the editbox (paintbox).
Editing of a character images takes place in the editbox, using the mouse. Changes are registered in Emap.
A character image is encoded by a its stripelist.
The fontlist is an array containing all character stripelists.
The fontlist may be loaded from disc, saved to disc or saved to disc as a bitmap.
In this way a font may be added conveniently to an application, inside a Timage component.
 |
| fig6. |
There we see the result of the encoded character.
Character height and styles are selectable.
Controls (buttons) enable the storage of the stripelist into the fontlist, loading the stripelist from the fontlist or deletion
of a character from the fontlist.
To inspect an encoded character, the mathmap bitmap may be displayed enlarged in the editbox.
The stripelist is an array of (16 bit) words. 10 bits per word are used. The fontlist is an array of DWORDS (32 bit). The stripe instructions are packed 3 in a DWORD.
Data formats
Below is the format of a specific character stripe list:  |
| fig7a. |
H1..H4 and V1..V4 mark partitions in the editbox. The reason is explaned later in this article.
Table length is in DWORDS. The SY 0 stripe instruction may be used as a NOP (no operation).
Unused 10 bit fields in the DWORD should be set to zero.
Below is the format of the fontlist, containing all the stripe lists:
 |
| fig7b. |
Unused character codes are simply missing in the fontlist.
The fontlist may be stored as bitmap. The format is :
 |
| fig7c. |
C1..C8 again is the name of the font.
The length of the stripe list varies per character. Therefore the character indices point to the start of the characters stripelist.
Drawing a character.
The stripelist describes a character having a height of 96 pixels. So in most cases reduction will be needed.Figure 8 shows a detail of the painting process: the drawing of a stripe:
 |
| fig8. |
row 1.............[i,j] , [i+1,j] , [i+2,j]
row2..............[i,j+1], [i+1,j+1], [i+2,j+1]
i , j are integers.
In case of reduction, the stripe height will be less then 1 (1 is the height of the pixel).
The stripe being painted is shown by the red rectangle.
The stripe position is given by floating point values FX1, FY1, FX2, FY2.
Per pixel the overlap with the stripe is calculated. dx is the base and dy is the height.
So, dx * dy is the area of the pixel covered by the stripe. The value dx * dy * 250 is stored in unused byte 3 (bits 24..31) of the pixel.
Note that the 32 bit true color pixelformat is used.
If at a later time another stripe covers the same pixel , the overlap value is added to the pixels byte 3.
After executing the stripe list a scan of all bytes 3 of the affected pixels takes place.
The value of these bytes is from 0 to 250.
Part w/250 of the character color is now blended with part (1 - w/250) of the background color and
this value is written in the pixels DWORD.
Partitions
In case a character is painted with reduced height the stripe's start and finish will not always coincide with the screen pixels.The result is slurred edges.
To allow alignment with screen pixels, so called 'slide lines' may be drawn on the editbox.
The maximum is 4 horizontal- and 4 vertikal lines.
These lines split the editbox in 5 horizontal- and 5 vertical partitions (maximal).
The edges of these partitions are aligned with the screen pixels when the character is painted.
Each partition is scanned separately. Alignment is calculated at drawing time by providing slightly modified multiplication factors and offsets.
The slide values are stored in fields H1..H4 (horizontal) and V1..V4 (vertical) of the stripe list.
The SP hor,vert stripe instruction selects the active partition.
If no slides are drawn, the editbox is one big horizontal and one big vertical partition.
Example:
-
say H1 = 12 and V1 = 32, H2..H4 = 0 and V2..V4 = 0
-
1. pixels 0..11 and
2. pixels 12..95
-
1. pixels 0..31 and
2. pixels 32..95
The partition information allows for alignment of the character with screen pixels. A character has become, so to say, somewhat elastic.
Figure 9 shows the effect. At left unaligned, right aligned at left bottom.
 |
 |
| fig9a. | fig9b. |
type TXPart = record
                LT   : byte;    //left (hor) or top (vert) of partition in 96 pixel size
                bias : integer; //left or top of partition in reduced size
                mult : single;  //multiplier
              end;

     TXpartition = array[1..5] of TXpart;


var HXpartition  : TXpartition;  //horizontal partitions
    VXPartition : TXpartition;  //vertical partitions
procedure unpackslides extracts the H1..H4 and V1..V4 values from the characters stripelist and calculates the values of HXpartition and VXpartition.
For details I refer to the source code.
Below is figure 10 with an example.
There are two horizontal- and three vertical partitions.
The red lines in fig. 10b have no meaning.
 |
 |
 |
| fig10a. | fig10b. | fig10b. |
fig. 10b: enlarged image of aligned character.
fig. 10c: same enlarged image without alignment
Styles
Posible styles are bold, italic, w i d e and all combinations.The effects are obtained by manipulating the values FX1 and FX2 (see figure 8)
Following constants define images which are pictured using a style:
-
boldexpansion = 4.......{lengthening of a stripe}
widefactor = 1.33.........{horizontal enlargement of character}
ITtangent = 0.25..........{shift of top of character / character height}
   XFboldexpansion : byte;    {stripe lengthening for bold}
   ITtopshift      : byte;    {shift count of top of character for italic}
   XFmult          : single;  {horizontal  multiplier}
   YFmult          : single;  {vertical multiplier}
   .........
   YFmult := fontheight/96;
   if bold then XFboldexpansion := boldexpansion, else XFboldexpansion := 0
   if wide then XFmult := YFmult * widefactor else XFmult := YFmult
   ITdx := ITtangent * YFmult;
   ITtopshift := trunc(XFbaseline * ITdx + 0.5);  {XFbaseline = 77}
Drawing of a stripe is done byprocedure markstripe(x1, x2, y : byte); // draw stripe from x1 to x2 at vertical position y
x1, x2 and y are relative to the character, so for use in an application the character position has to be added.
The following calculations take care of the font style:
begin

//-- adjust x1,x2 acc. to fontstyle --

 x2 := x2 + XFboldExpansion;

 if XFstyle and XFitalic <> 0 then
  begin
   ShiftX := ITtopshift - y * ITdx;
  end
  else ShiftX := 0;

//-- calculate stripe --

 with HXpartition[HP] do
  begin
   FX1 := sx + Bias + (x1-LT) * mult + shiftX;
   FX2 := sx + Bias + (x2-LT) * mult + shiftX;
  end;
 with VXPartition[VP] do
  begin
   FY1 := sy + Bias + (y-LT) * mult;
   FY2 := FY1 + mult;
  end;
....................................
below are pictured some results (fig. 11). The three legs of the m are aligned at left side.
 |
 |
 |
 |
 |
 |
 |
 |
normal | bold | italic | wide | bold/italic | bold/wide | italic/wide | bld/it/wide |
XfontDeveloper help
The program itself does not contain help information.Some of the help information is presented below:
 |
| fig12. |
Main menu buttons
 |
| fig13. |
The "DavArrayBtn" component is found on my website at:
www.davdata.nl/math/arraybtn
The menu buttons offer the following choices:
| open | open a customfont (extension .dav) |
| save | save a customfont (extension .dav) |
| save in bitmap | save customfont as bitmap |
| windowsfont | show all Windows characters |
| mathfont | show all characters, select by mouseclick |
| edit | edit image in editbox |
| load image | load bitmap image from disc |
-
- use arrow keys to shift horizontal or vertical
- press left mousebutton to add pixels
- press right mousebutton to delete pixels
single pixel addition/deletion or pixelrows, -columns or rectangles.
When an image in the editbox is finished it is translated into stripe instructions by pressing the <--- xlate button.
(Note: 'edit' mode should be selected)
The stripelist is executed and the character is pictured with the selected style and height.
Select the proper code of the character and cllick the 'store' button to add the stripelist to the fontlist.
Partitions (or slide lines) are added by clicking on the yellow bands above and left of the editbox.
Click the left mousebutton to add, click right to delete.
Shift a slideline by pressing and holding down the leftmousebutton, move to new postion and release the mousebutton.
Measurements
length of some stripelists in DWORDS| A | 44 |
| H | 14 |
| @ | 77 |
| height | 16pix | 24pix | 32pix |
| A | 66 | 86 | 106 |
| H | 64 | 86 | 104 |
| @ | 127 | 167 | 210 |
Status of the Xfont project
This Xfont developer project enables the construction of customfonts by re-assigning codes to existing characters,mixing characters of various fonts, adjusting existing characters or adding new character images.
All characters are encoded from a 96 * 96 pixel resolution image into a list of (stripe) instructions which allow
image manipulation for height and style selection.
A Xfont character is written to a bitmap canvas.
So finally this bitmap has to be copied to a paintbox or printer canvas to become visible.
The partition trick to avoid smudging of small characters still has room for improvement.
In the source listing the place is indicated where this code should be inserted.
To be implemented in a math-editor I have constructed three Xfonts so far:
notice.dav, royal.dav and techno.dav all having the same character codes.
The fonts are a mix of regular- and math characters.
Each Xfont file has a size of about 25kBytes.
The math editor is still under construction.
It will combine formula editing, geometrical constructions and equation graphs.
Below the notice Xfont (derived from the windows 'arial' and 'symbol' fonts)
 |
| fig14. |
The Xfont project
Xfont96dev is written in Delphi-7.There are 5 units (1..5) which take care of :
-
1. low level painting, event processing, menu's
2. Emap array processing, stripe list generation and partitions
3. character draw procedures
4. load, store, open, save, save to bitmap procedures
5. microseconds timer procedures
To load the Xfont developer program, click at the download (lightning) icon at the top of this page.
To load the complete Delhi-7 project, click [here]


