

 |
 |
Delphi drawing, part 2 |  |
 |
contents
| part1 | modifying pixels in a bitmap |
| part2 | drawing dots and lines: the XBitmap class |
| part3 | flicker free painting |
| part4 | drawing circles and ellipses |
Introduction
Part-1 of this article summarized the basic ways of modifying pixels.
Main conclusion was that for fast drawing it is best to write directly to memory,
minimizing the use of the pixels[..,..] or scanline[..] properties.
This requires calculation of the pixel address.
Goal of this little resarch is to add some extra features in the TBitmap class.
This new class is called the XBitmap class.
The new features are:
-
- clipping rectangle
- 4 drawing levels
- multipixel wide dash - dot lines, 20 styles
- improved stretchdraw method
- improved floodfill, with (optional) enlarged fill patterns for printing
- optional arrows at begin/end of lines and arcs
- calculation of rectangle that was modified
By default, the XCliprect rectangle is set to the full size of the bitmap.
Pixels outside this rectangle cannot by modified.
When lines, circles, polygons ... are drawn, painting outside the XCliprect is suppressed.
Drawing Levels
Bits 0,1 of a pixel (so blue bits 0,1) make the drawing level.
Highest level is 0 (00), lowest is 3 (11).
Reason is the white ($ffffff) background of the printer canvas.
Typical use of the levels may be
-
level 0 - (00) : foreground color for text, lines
level 1 - (01) : grids
level 2 - (10) : user supplied background (brush when filling rectangles...)
level 3 - (11) : system supplied backgound
The effect is a 4 layer bitmap.
Modified Rectangle
The XModRect rectangle contains the modified pixels.
Outside XModRect no pixels were changed on the most recent operation.
XModRect assists in dynamic drawing where modifications in the bitmap must
be copied to a paintbox.
XBitmap Properties
-
XPenwidth ...............................(1..32) the diameter of the pen
XPenLevel, XBrushLevel .........(0..3)
XPenColor, XBrushColor ........(DWord with r,g,b color value)
XlineStyle .................................(0..19) dash - dot pattern selection
Xarrowcode..............................(0..15) type of arrow + bit8 = 1 for begin arrow, bit7 = 1 for end arrow
Xfillstyle....................................(0..15) selects fill pattern for floodfill
XfillSize....................................8*8 (normal) or 24*24 (printer)
XUsebrush...............................true if brush is in use
-
myXbitmap.Xpenwidth := 10;
-
Xdot...................paints a dot, using selected penwidth
Xline...................paints a line in selected dash-dot pattern with optional arrows
Xfillrect...............paints rectangle, optional : rounded edges
Xfloodfill.............flootfills area within Clipping rectangle and bound by level 0 pixels
XStretchrect......copies rectangle and adjusts size
XEllipse.............draws ellipse (circle)
XArc..................draws ellipse (circle) arc, optional arrows at begin or end
XPolygon...........draws polygon
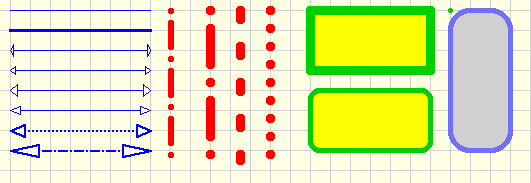
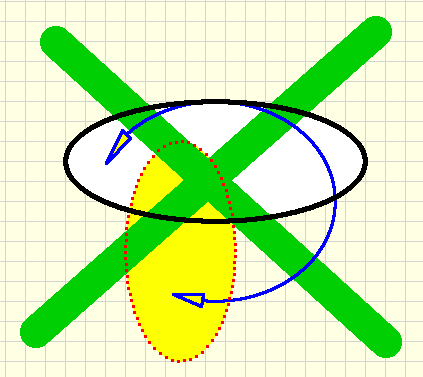
1. some line styles, arrows and XFillrect options
 |
a. paint black ellipse at penlevel 0
b. paint red ellipse at penlevel 1
c. paint blue ellipse at penlevel 2
d. paint fat green line the latest at penlevel 3
 |
 |
The pen image is held in
-
FXPen : array[0..31] of DWORD
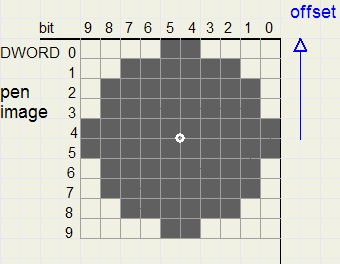 |
A "1" bit causes the pencolor to by copied for that position.
The full array is only in use for a 32 pixel wide pen.
If the penwidth equals 2 only bits 0,1 of words 0,1 are in use.
When a new penwidth is selected, a new image must be calculated.
Procedure below (protected) generates that pen image
 procedure TXBitmap.setPenwidth(w : byte);
//make pen image
var i,j : byte;
    h,v,r,r2 : single;
    mask : DWORD;
begin
 if w = FXpenwidth then exit;
 if w > 32 then w := 32;
 FXpenwidth := w;
 FXpenBias := (w-1) shr 1;

//------- make pen image --------------------

 for i := 0 to 31 do FXpen[i] := 0;//erase pen
 r := w/2;
 r2 := r * r;
 for j := 0 to (w-1) shr 1 do    // j is vertical movement over half height
  begin
   v := r - (0.5 + j);
   for i := 0 to (w-1) shr 1 do  // i is horizontal movement over half width
    begin
     h := r - (0.5 + i);
     if h*h + v*v <= r2 then     // pythagoras lemma
      begin
       mask := 1 shl i;
       mask := mask or (1 shl (w-i-1));   //  horizontal copy bit
       FXpen[j] := FXpen[j] or mask;       //  set bits
       FXpen[w-j-1] := FXpen[w-j-1] or mask;    //  vertical copy bits
      end;//if
    end;//for i
  end;//for j
end;
|
From FXPen[0] bit 0, right top, a square of size penwidth/2 is defined.
Within that square we visualize a fitting circle.
A bit within that circle is set to "1", a bit outsie is set to 0.
Calculations are limited to one-quarter only, the other 3 bits are set by copying.
 |
-
myXBitmap.Xdot(10,20)..........paints a dot of diameter PenWidth at coordinates (10,20)
Dot is also called by the line and ellipse methods.
Xdot updates the ModRect, Dot does not.
Below is the source code
procedure TXBitmap.XDot(x,y : integer);
begin
 Dot(x,y);
 makeModRect(x,y,x,y,(FXPenwidth shr 1)+2);
end;

procedure TXBitmap.Dot(x,y : integer);
//write a single dot,
//use FXpenwidth,Xcliprect,Xlevel,FXpencolor
var i,j : byte;
    bitmask,pline : DWORD;
    p : PDW;                              //PDW is pointer to DWORD
    xi,yj : integer;
begin
 x := x - FXpenBias;
 y := y - FXpenBias;
 for j := 0 to FXpenwidth-1 do
  begin
   bitmask := 1;
   yj := y + j;
   if (yj < FXcliprect.top) or (yj >= FXcliprect.bottom) then continue;
   pline := FXpbase-FXlineStep*(yj);       //pline points to 1st DWORD of row
   for i := 0 to FXpenWidth-1 do
    begin
     xi := x + i;
     if (xi >= FXcliprect.left) and (xi < FXcliprect.right) then
      begin
       p := PDW(pline + (xi) shl 2);        //p points to pixel
       if (FXpen[j] and bitmask) <> 0 then
        if FXpenlevel <= (p^ and $3) then p^ := FXpencolor;
      end;
     bitmask := bitmask shl 1;
    end;//for i
  end;//for j
end;
|
Drawing Lines
Lines consist of dots. See picture below for an enlarged view.
The (0,0) coordinates are left-top of the screen. Down is the positive Y - direction
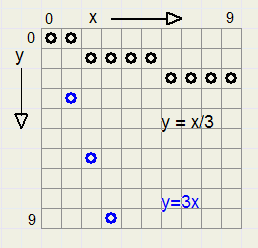 |
produces isolated pixels : the line has "holes" .
Reason is the way the line is built : increasing x one by one and calculating y.
The general equation for a straight line through (0,0) is : y = mx.
For m < 1 x must be stepped (one by one) and y is calculated. (result rounded to nearest integer).
For m > 1 we change the equation to x = (1/m)*y and this line is plotted by incrementing
y (one by one) and calculating x.
Lines with holes are unacceptable because they do not bound areas to be floodfilled.
Dash - Dot patterns
See definition below:
                                                      //preset
const linepattern : array[0..19] of word =           //dash - dot patterns
                    ($ffff,$aaaa,$cccc,$eeee,$f0f0,
                     $f8f8,$fcfc,$fefe,$8888,$c0c0,
                     $e0e0,$ff00,$8080,$bebe,$9c9c,
                     $dede,$ff18,$ff88,$ffe4,$fffa);
|
Let d be the distance of a pixel on a line to the first pixel of that line.
b = d mod 16 is a value ranging 0..15.
If bit b of the pattern is '1', the pixel is painted, if the bit is '0' no pixel is painted.
This is the method to generate dash - dot lines.
If the penwidth is 2 then we calculate b = (d div 2) mod 16.
Now, the result is not exactly what we want, see figure below
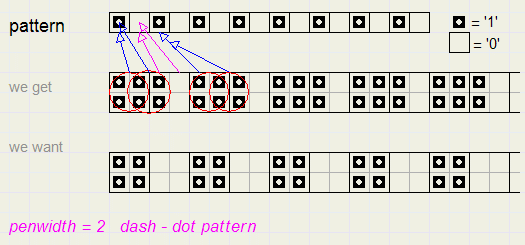 |
Let's look more closely what happens.
For d = 0 we write pixels 0,1 of the line.
For d = 1 we write pixels 1,2 , for d = 2 , b = 1 , no painting because the pattern bit is '0'.
Forgetting that we are working with integers , b = d/2.
For d = 1, b = 0.5 and a pixel starting at 0.5 ranges from 0.5 to 1.5 in the pattern, so partially
covers bit 1 by mistake.
Now the fix becomes clear (I hope). Simply make a second check but use trunc(b + 0.9) instead of b.
This fixes all penwidths.
Below is the Xline method source code
 procedure TXBitmap.Xline(x1,y1,x2,y2 : integer);
//paint line from (x1,y1) to (x2,y2);
//use xpenwidth,xpenstyle,xlevel,cliprect
var dx,dy,ipen,x,y,w,PL,PD,PBX,PBY : single;
    steps,i : word;
    beginpijl,eindpijl : boolean;
    PA,PB : array[0..2] of TPoint;
    PLX,PLY : smallInt;

begin
 dx := x2-x1; dy := y2 - y1;
 if (dx = 0) and (dy = 0) then
  begin
   XDot(x1,y1);     //make modrect
   exit;
  end;

 beginpijl := (FXArrowCode and $40) <> 0;  //begin-arrow
 eindpijl := (FXArrowCode and $80) <> 0;   //end-arrow
 if beginpijl or eindpijl then
  begin
   w := sqrt(dx*dx+dy*dy);
   pijldimensions(PL,PD);                //get arrow dimensions PL, PD
   eindpijl := eindpijl and (1.2*PL < w);
   beginpijl := beginpijl and (2.2*PL < w);
   w := 1/w;
   PLX := trunc(PL*dx*w+0.5);
   PLY := trunc(PL*dy*w+0.5);            //arrow length
   PBX := PD*dy*w;
   PBY := PD*dx*w;                       //arrow width
  end;

 i := (FXPenwidth shr 1)+ 2;
 if (beginPijl or EindPijl) then inc(i,trunc(PD+1));
 makeModRect(x1,y1,x2,y2,i);

 if beginpijl then
  begin
   PA[0].x := x1; x1 := x1 + PLX;
   pa[1].x := trunc(x1+PBX+0.5);
   pa[2].x := trunc(x1-PBX+0.5);
   pa[0].y := y1; y1 := y1 + PLY;
   pa[1].y := trunc(y1-PBY+0.5);
   pa[2].y := trunc(y1+PBY+0.5);
  end;
 if eindpijl then
  begin
   pb[0].x := x2; x2 := x2-PLX;
   pb[1].x := trunc(x2 + PBX+0.5);
   pb[2].x := trunc(x2 - PBX+0.5);
   pb[0].y := y2; y2 := y2 - PLY;
   pb[1].y := trunc(y2 - PBY+0.5);
   pb[2].y := trunc(y2 + PBY+0.5);
  end;

 dx := x2-x1; dy := y2 - y1;              //must recalculate dx,dy
 if abs(dy) <= abs(dx) then
  begin                                   //hor. orientation
   steps := abs(trunc(dx)); dy := dy/steps;
   if dx > 0 then dx := 1 else dx := -1;
  end
 else begin                               //vert orientation
       steps := abs(trunc(dy)); dx := dx/steps;
       if dy > 0 then dy := 1 else dy := -1;
      end;
 ipen := 1/fxpenwidth;
 x := x1; y := y1;
 for i := 0 to steps do
  begin
   if ((($8000 shr (trunc(i*ipen) and $f)) and FXlinePattern) <> 0) and
      ((($8000 shr (trunc(i*ipen + 0.9) and $f)) and FXlinePattern) <> 0) then
      Dot(x1,y1);
   x := x + dx; x1 := trunc(x + 0.5);
   y := y + dy; y1 := trunc(y + 0.5);
  end;

 if beginpijl then Polygon1(pa);
 if eindpijl then Polygon1(pb);
end;
|
In lines before, variables are initialized and arrows are taken care of.
Notice the horizontal (y = mx) or vertical (x = (1/m)y ) orientation.
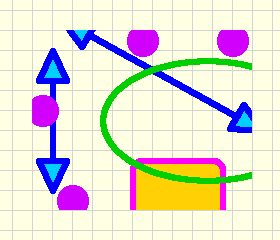
The Arrows
The arrows are painted by calling the Polygon method.
See figure below:
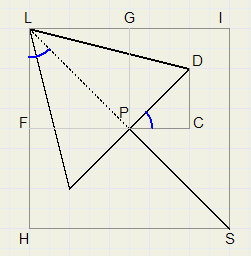 |
Note: "Pijl" is "Arrow" in dutch.
Assume start of line at L(0,0) and end of line at S.
First, coordinates of P are calculated.
-
DLPG ~ DLSI.......................{similarity}
LG / LI = LP / LS.............LG = LP * LI / LS
PG / LH = LP / LS...........PG = LP * LH / LS
-
DPCD ~ DLHS.......................{similarity}
PC / LH = PD / LS.............PC = PD * LH / LS
CD / HS = PD / LS............CD = PD * HS / LS
In the source listing above.....LH = dy, LI = dx , 1/LS = w , PC = PLX, CD = PLY
This concludes part - 2.
Using the XBitmap exerciser
Click at the left-top icon on this page to download the exerciser.
The exerciser allows you to explore all extra's of the Xbimap class.
Because the -help- information is not available in the program it is listed below.
Menu buttons at the top of the form select the type of operation.
Properties are adjustable by clicking on the appropriate UpDown control.
To paint a (clipping) rectangle,line or ellipse:
Select menu:line or menu:ellipse...........
Move mouse over paintbox, press left mousebuttton at start of line.
While pressing left mousebutton, move mouse over paintbox.
Release left mousebutton at end of line.
Note : mousepointer is rounded to multiples of 5, unless the SHIFT key is pressed.
Painting an arc: Select menu:Arc.
Proceed as painting an ellipse.
When the left mousebutton is released, a line shows up, connecting the middle of the ellipse
to the mousepointer.
The intersection of this line and the ellipse is the start of the arc.
Mouse mousepointer to starting position of arc, then press left mousebutton and hold.
Move line counterclockwise and release mousebutton when line intersects ellipse at
end of arc.
Polygons:
At Menu:polygon, a standard polygon is painted.
Move mousepointer over angles : a small purple square shows up.
(press SHIFT if not, angle may not be multiple of 5)
Press mousebutton and move, to change the shape of the polygon.
Stretchdraw:
First paint a clipping rectangle. This will be the size of the picture.
Select menu:picture , select *bmp type picture from the dialog.
Move mousepointer over corners of picture: a small purple square shows up.
Press and hold mousebutton, move mouse to adjust the size of the picture.
Notice the difference between "fullSource" and "fullDestination".


